• Skip to primary navigation
  • Skip to main content
  • Skip to primary sidebar
  • Skip to footer
  • Home
  • Interior Decor
    • D.I.Y
    • DIY Interior
    • Tips
  • Hobbie Crafts
    • Furniture Upcycle
  • Garden
  • News
  • Write For Us
  • Contact Details

A2B Crafts

DIY Crafts & Upcycling

A2Bcrafts

1st April 2019 D.I.Y

Home Improvements: What to do with shells from the beach

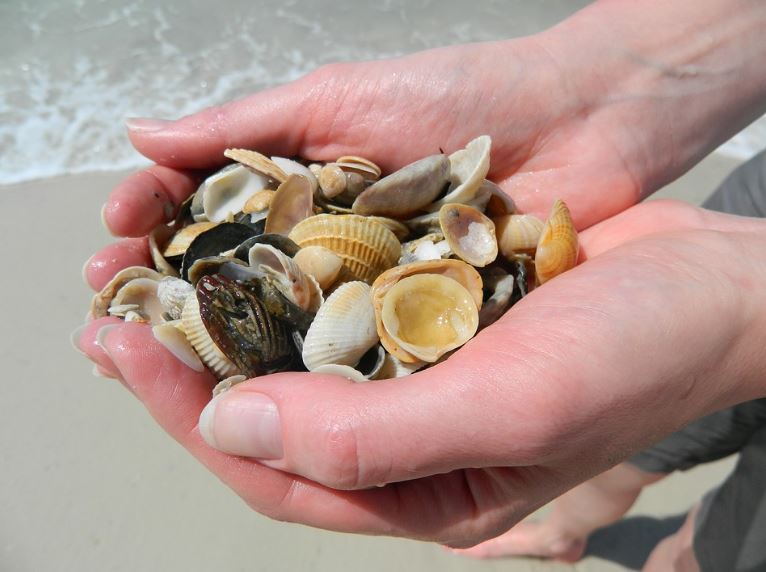
When you think of home improvements, you would most probably think about them costing you a dime or two. Well it doesn’t have to be that way, all it takes is getting your hands dirty, some elbow grease and our help to improve your home in a number of ways by using the seashells from your favourite beach.

You’ve most probably collected shells before with your little one, perhaps for one of their own art projects or easy shell crafts they can do at home. But we bet you’ve never collected them to improve your home. There are plenty of ways you can use shells to add attention to detail in a bathroom or dining area, keeping you up to date with the latest home decorating trends 2019.

Here are just some of the things you can do with them.

But before we get into that, you’ll want to know how to properly clean your shells so you can get a spotless look which will match perfectly with the rest of the home…

How to Clean Shells from the Beach

There’s actually quite the debate always going on about how to clean seashells from the beach, do you use baking soda? Regular fresh water? How about the water the shell was found in?

There are many different opinions across the web, here is ours;

MURIATIC ACID, shells will finally have their natural colour back and you’ll see a more beautiful side to them!

But don’t worry, muriatic acid for those of you who don’t know is just another word for hydrochloric acid. Which can be found in many household products such as toilet bowl cleaner and tile cleaner. This exact acid can be used to clean your shells.

Here is a safe solution for you and your shells and how to get them clean;

  • ¼ cup of muriatic acid and ¾ cups of water.
  • Dip for a maximum of 3 seconds and neutralize in fresh water straight after.
  • Avoid contact with skin and stainless steel

If you want to see the process of cleaning shells from the beach and you want to be mesmerized by the dirty to clean to shells, check out the how to bring back color to seashells tutorial.

How to make Seashells shine

It’s one thing cleaning your shells and making them look like they would in the sea, but it’s another thing completely to have them featuring their natural shine. With some mineral oil, you’re going to want to rub over the shell to give it a deep clean, it does 2 things:

  • It restores the natural shine of the shell
  • It preserves the shell

How to keep Seashells shiny

Finally you’ve got that shine back, but how do you go about keeping that beautiful shine so that after you’ve created your masterpiece, you can be happy knowing nothing is going to ruin ti design?

You can spray satin-finish polyurethane or coat with clear nail polish. Although this may be a lengthy process for each shell you have, you’ll be able to reverse the shells organic shiny look and give it an even extra glossy shine.

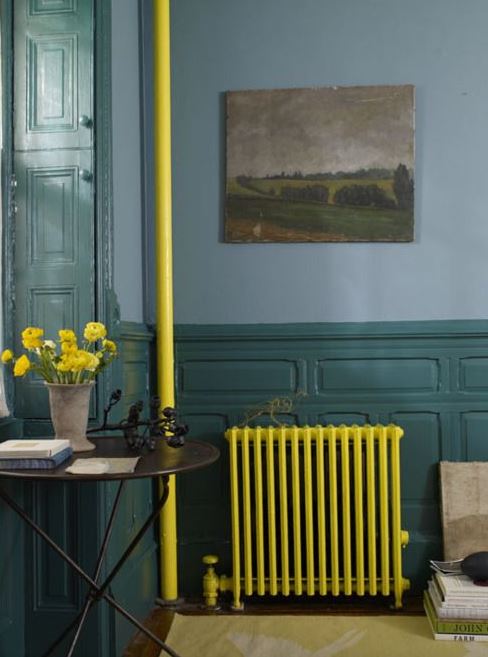
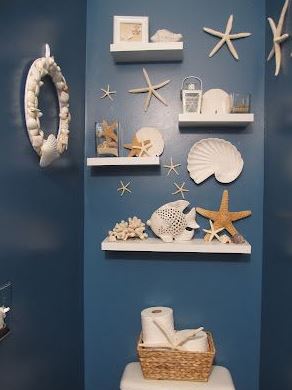
Decorating with Seashells in a Bathroom

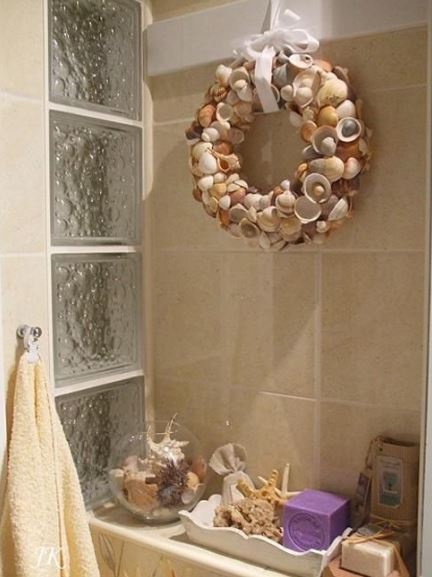
Just like using old storage pallets to create your very own DIY furiture, there are plenty of ways you can use seashells to bring out a natural vibe in your home, especially in the area of your bathroom where these shells will fit the most.

Here are some end results, from the people who are already using this cost efficient way of bringing stylish design to their homes.

Seashell Display Jars

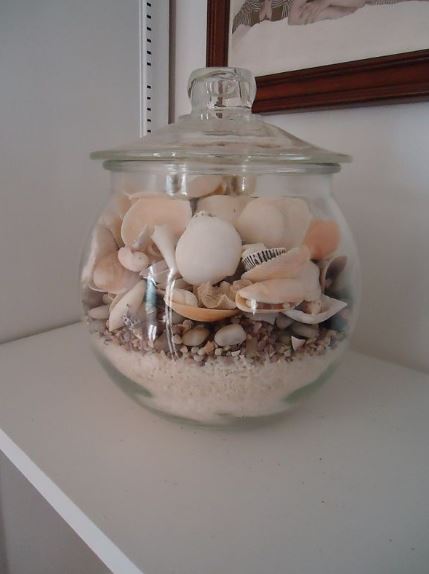
You’ve probably seen plenty of these from the image above, seashell display jars are one of the most common and probably the most stylish way of bringing the beautiful gems of the ocean into your home. Without compromising on the design of your home.

The best part about beach in a jar is that there is no limitation to what you can do and no two jars look the same so this way you can have something unique that only you own.

Jars with sand and shells are not limited to a bathroom, although we think they do look the best in there, these wonderful creations can also work to work with their environment, making them great in kitchens and lounge areas that feature ocean colours.

Now, we bet you’re excited to go ahead with going to your local beach, picking out some decorative shells and making your own sand and shells in glass jars. But we also know you’re probably wondering how the hell you go about gluing your shells to glass? Or how you even managed to get the sand to stick without it looking complete without purpose?

Read on to get some pro tips on how you can achieve your seashell in a jar dreams.

How to Glue Shells to Glass

Less is always more, as they say. Applying glue to shells is no different, there are many different techniques and practices for going about this. You’ll need some form of hot glue, typically that will from one of the craft glue guns from your local craft store.

Once acquired, you’ll want to squeeze a sizeable amount of glue on the outside of the glass, then you’ll want to take your best looking seashell and press down firmly on the glue. Hold for a minimum of 60 seconds to ensure the glue can harden around your shell. Repeat this process till you’re happy with your final design.

How to Glue Sand in a Jar

It’s important you get the consistency right, with to much glue you’re going to look you made this with a blindfold on, alternatively with not enough glue your sand won’t stick to the glass and you won’t get the desired effect.

To get the desired look, you’re going to want to follow our golden rule:

For every 1 cup of sand, you’ll want to have 1 cup of glue.

Doing this, you should get a thick mixture, with a little mixing you’ll be ready to add your gooey sand to the surface of your jar, spread out evenly for a balanced finish.

Other creative uses for seashells in your home

Beyond the basics of using shells and sand to make glass shell jars, there are other creative uses for seashells that you can use within your home, outside of the bathroom area.

As a side note, seashell crafts for adults is fun but it’s even more enjoyable once you get your kids involved. Allowing them to help you create something that is going to be a cherished part of your home for potentially many years.

Seashell Display Case

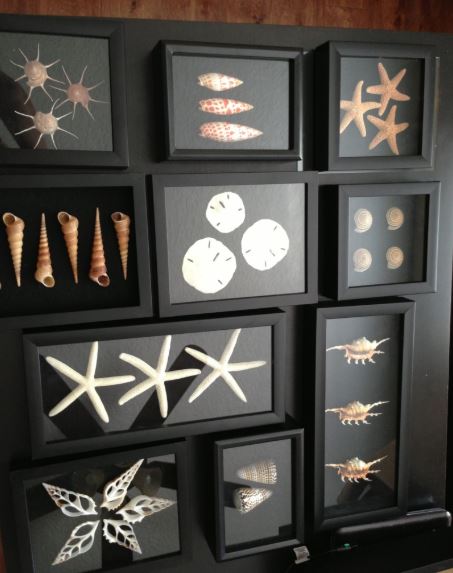
For collectors out there, this is one of the ways you can proudly put your favourite seashells on display.

These seashells were probably left over from your glass jar projet, you’ve probably thought to yourself ‘these are just too beautiful to use’ and instead just threw them in a draw never to be seen again.

Making something out of them and putting them on display gets you the best of both worlds. You can admire a natural resource whilst adding a personal touch to your home, wherever you choose to feature your brand new display case.

There are many ways you can come up with to add shells to a display case, one of them would be to use a wooden, sort of like a larger display cause would be used from and assigning compartments for your favourite seashells. Maybe in order of size, type, or even colour.

We have yet to cover how you’re going to manage to add shells to the display cabinet, so here’s how to glue shells to wood.

How to Glue Shells to Wood

Just like glueing to glass, you’re going to want to get a hot glue gun from your local craft store, so that the shells you attach will stay attached. However it is advised that you clean your wood before hand as dust and other particles can be visible even after the job has been completed, mostly this goes unnoticed with glass surfaces.

Seashell Shadow box

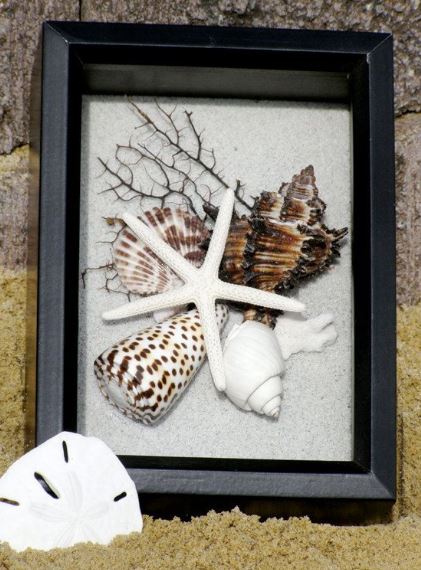
Similar to display cases, using a shadow box to display your shells will offer you another way of bringing in the natural design. However, these should be used as an alternative if you truly take pride in the design of your home, and you’re looking for a way to add shells that won’t compromise the general design.

This is because, unlike display cabinet, shadow boxes feature a more organized finish making them ideal for people who like to have a modern home looks like each decor piece was placed with purpose.

Shell Shower Curtains

You’ll most probably see some form of shell shower curtains in your home, but I bet they are all printed designs and not the real thing. Well why not use the real thing and create some fabulous curtains from them?

Whether you start off with a blank curtain or you use a shell design that is going to compliment the actual shells which you’re going to feature. However you choose to go about this fun craft, make sure to glue everything down properly and have some fun with it.

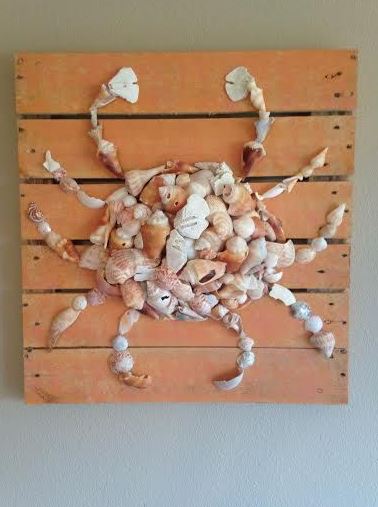
Seashell Animal Crafts

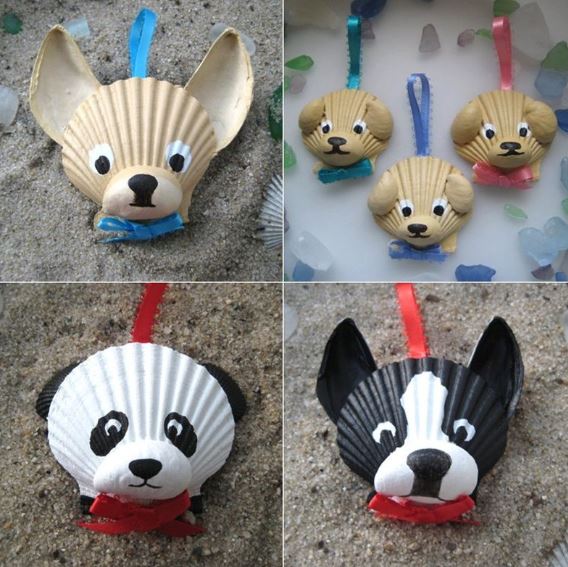
With seashell crafts, with usually think about larger designs, whether that’s shell curtains or seashell jars. But what about little dinky ornaments that can fit on any tableside in your home that can bring you some unique style that has been made from seashells?

These little dicnky ornemants are seashell animals, whether you’re a lover of foxes, ladybirds or any other animal in existence, we are sure you can achieve the design with a couple of sea shells, some paint and a great deal of imagination.

How to make Seashell Animals

Now, this would depend on what sort of animal you’re looking to create. Thankfully we live in the age or internet so having resources for this information won’t be too hard to find, however we want to give you a head start, here are some tools you’re going to need if you want to create one of these beautiful pieces for yourself.

  • Hot glue gun
  • Some of your favourite paint and paint brushes.
  • And a creative mind

If you’re unsure what to create, perhaps you don’t have a favourite animal or you’re just looking for a unique idea, here is over 100 seashell animal crafts to inspire you.

Broken Seashell Crafts

When we’re looking for seashells, we usually look for the most pretty and eye catching ones, I mean that’s just the way we are naturally as humans to seek out the most beautiful thing as possible.

But that means we waste materials that could add to our home, such as broken seashells.

Broken seashell crafts are unique in the sense that they take something that seems to be at the end of its life time, soon to be washed away or thrown away and turn it into something that is elegant yet charming and a piece that could become a great addition to a bathroom, lounge or bedroom area in a home.

18th March 2019 D.I.Y

How to Cover Unsightly Boiler Pipes

Check latest price of radsnaps here

Although we are deeply grateful for the warmth that boilers provide, they’re certainly not the most alluring item you will have in your house. They don’t add much to a room’s décor. The pipes mess up the interiors and make rooms look lousy. Actually, they are an eyesore and can neutralize the elegance in any captivating décor – unless of course your home is of the rustic style, then move along because boiler pipes can add to the design of the home.

Otherwise, to counter this effect most homeowners often find themselves investing in false ceilings, new cabinet designs and even reconstructing and breaking down walls just to ensure that the boiler pipes are not exposed. Though very effective, these approaches are very expensive and need a lot of time to implement.

What’s more, you will need to hire qualified professionals who charge exorbitant amounts for these sort of ‘home improvements’. This essentially means that if don’t have deep pockets or know the right people, you will have to put up with unsightly bathrooms and rooms that look like dreary for a very long time! Very depressing right?

Fortunately, there are some things you can do to salvage the situation affordably. Read on to find out about interesting but cheap ways on how to cover unsightly boiler pipes:

Conceal with design tapes or radiator pipe sleeves

Design tapes can transform unsightly pipes from an eyesore to beautiful and attractive pieces. You can find decorative tapes at local stores for a price tag that won’t break your budget. Try them today and watch as your space changes from drab to fab!

You can use radiator pipe covers that come in various decorative colours, like these chrome radsnap radiator pipe sleeves/covers below delivered fast from places like Amazon.

chrome radsnap radiator pipe sleeves and covers
Chrome radiator pipe sleeves

Check the latest prices on radsnap radiator pipe sleeves here

Radiator pipe collars also known as rad rings or pipe roses are a nice finish for the base.

Check the latest price on these pipe collars

Box in the pipes

Consider boiler casings if you want to spruce up the pipes underneath the boiler. They are specially designed cases that cover the pipes completely concealing them safely and giving the house a tidy appearance. Just ensure that pipework, as well as the boiler, have enough ventilation and that the casings you use meet the standard requirements.

Check latest prices on this thermopanel boxing

Use DIY chalkboard covers

If you have time, why don’t you create your chalkboard cover (You will need to be an expert DIYer)? Create an MDF frame that goes around the boiler and the pipes then box the entire unit. For a practical cover that keeps the pipes discreet, use a lick of chalkboard paint.

Cover them with fake foliage

This is an amazing boiler pipe cover that will definitely give your home a tropical feel. Fake foliage offers a seamless solution to ugly pipes blemishing your home décor. For those who can afford real foliage, go for creepers and climbers. Though they require some effort and time in conditioning, watering and pruning them, they look excellent!

Check the latest prices on fake foliage here

Paint the pipes in lively colours

Don’t just paint them like everybody else, do it with a twist! You can get ideas from your kids or spouse. Help each other with ideas and skills and you will be surprised at how creative you are. The results will definitely be spectacular. Not to mention you will spend time with your family and have memories to treasure forever whilst adding a unique touch to your home that the entire family can be proud of, since they were a part of it.

Check the latest styles & prices of radiator paint here

Conceal with a Curtain

One convenient way to hide your unattractive boiler pipes is to hang some fabric or a small curtain in front of them. This way the pipes will not only be easily accessible in case of a malfunction, but you will also not see them whenever you visit this particular room. Don’t forget design matter, so don’t just use a random curtain to hide the pipes, ensure it will complement the space in its own right too, as to not draw unnecessary attention towards it.

Check out these ranges of curtains here

Factors to consider

Now, before you choose any concealing method, it is important to consider a few factors:

  • Which approach is the best for me?
  • Where is the boiler located?
  • What happens there and how exposed are the pipes?
  • Should you camouflage, detract or integrate them into the room’s décor design?

These should be answered before you start buying what you need to cover your boiler pipes, simply because even if you like the idea of let say…painting over them, they may not look right in your home. You’ll want to have a great balance of doing something you like and that you’re going to enjoy creating whilst making sure whatever it is your doing works for the home, since this is the purpose of the project after all.

Your Budget

Finally It is very important to consider these factors beforehand so as to help you pick the most stylish and appropriate solution for both you and your house. Also, when doing this, keep in mind that ventilation is very important. Be careful with what you cover and it should not interfere with the boiler’s functioning as well as your ability to access its internal parts.

Final Thoughts

Every apartment or house whether small or large has something that is plainly ugly, oddly placed or just weird. While these small problems may drive you nuts, stay they must because they are valuable as they are a part of the character of your home, which could offer a unique look when decorated properly using the tips we have just discussed.

Ultimately, the only viable solution is to be creative and make it your own. Luckily for you covering boiler piles is not that difficult, especially if you follow these handy tips. Good luck!

15th March 2019 Interior Decor

Master bedroom trends and home decorating trends 2019

When you hear the term luxury, what pops up on your mind? It definitely has something do with lavishness, richness, great comfort or splendor. How about you have all these combinations in the heart of your home, the bedroom! The following article will mention a few bedroom decor trends 2019.

The bedroom as you know is the most intimate room of the house, and after long day of breaking that sweat, you always look forward to having some quiet time in a calm space, with some good ambience.

Welcome aboard as I introduce you to the master bedroom trends 2019 you may want to incorporate in your bedroom this year. Why not welcome this year with a sense of style and more so, take it a notch higher by spicing up the bedroom furniture designs.

So, let’s take a look at the bedroom decor trends for 2019 and get inspired to have a gist of great ideas on how you can remodel your bedroom.


Chic shadow bedroom ideas 2019

Break the monotony of a dull-looking bed and be bold enough to make your bed a dream oasis. It’s very simple yet the end result gives your room an elegant touch. Get an outstanding head board painted with dulux chic shadow silk  that can be used on other items in the room to create uniformity. Another popular color for 2019 is the Dulux goose down paint available from amazon.


Delux chic shadow silk paint in greyDulux Chic Shadow Silk

Dulux Goose Down Paint MattDulux Goose Down Paint


Chic Shadow Dulux Paint


Chic Shadow Bedroom


Padded or Crushed Velvet Headboards

It should be large enough to allow you to comfortably lean against in case you want to read or just to relax before you sleep.

Going for a cushioned headboard has become one of the most sought-after trends today. This does not mean that you have to purchase a bed which has this design.

Save those extra coins and do it yourself by going online to check on DIYs of how you can make your own customized padded headboard.

Another tip on adding some zest on your bed is adding the number of pillows other than the traditional two pillows you already have. Normalize your room by harmonizing the range of colors that connect the furnishings together.


Rose gold bedroom ideas


Beds with a Skinny Frame

You could start by installing a bed with four posts in your bedroom. This could create an overwhelming effect on the rest of the furnishings in your room.

Picking a white colour or bright coloured walls and if you want to get a good contrast colours go with a darker bed frame.

You could also consider creating a balance in the colours and use differently sized furniture for instance pairing a thinner frame with some outstanding side tables and finish it up with some similar wood.


Bed-side table

There is a wide variety of side tables you can select such as the classic cocktail table, mirrored table, vintage-modern set, sleek storage and the teakwood cube side table.
Not only do these add style, but can also be used to store up your valuables.


Curvy designs

A popular trend you could get a hold of is chairs with a rounded back which will give some edge to the general look of the room.


Black and white bedroom ideas for small rooms

If your bedroom is not that spacious, you may want to create an illusion of room that looks large. The best way to go about this is to avoid having furniture such as a wardrobe or a walk in closet which may take up more space.

At this point, I would suggest getting furniture pieces that are easily convertible. Have a bed with drawers beneath it or add a chest piece at the bed’s foot that can also be used as a seat and for storage.


Black and white striped bedroom with storage


This is another trick you can use to get an impression of a larger sized room. Place mirrors to the closet doors or against the wall to do that.

If you also want to maximize on space don’t go for king size bed but instead, get a smaller sized bed. Also if you can get a ceiling fan that has lights, or suspended light fixtures, instead of having a night stands that will help you save on space.


Black white and gold bedroom ideas

Black and gold bedroom ideas 2019

Once you revamp the look of your bedroom putting all these suggestions into consideration, I assure you will find great satisfaction in spending quality time in your bedroom. Keep up with the trends 2019 get ready for the ultimate makeover and maybe make it a lovely black and gold like the room above!

11th April 2018 DIY Interior

3 steps to planning the perfect kitchen

Here are some great ideas for creating the perfect kitchen, in collaboration with Ideas for Living.

Designing a new kitchen is an exciting process as well as one that can swamp homeowners with choice. Understandably, many homeowners often get carried away with the desired look and finish, creating look-books and colour schemes and experimenting with different styles. Whilst this is an exciting part of the process, it is important to plan carefully and look beyond the aesthetic in order to achieve a space that truly works for you. Planning a new kitchen should always start with three key considerations:

#1 THINK ABOUT WHAT GOES ON IN YOUR KITCHEN – HOW CAN YOUR KITCHEN WORK FOR YOUR LIFESTYLE?

Firstly, think about what goes on in your kitchen and how you want to use the space. Consider factors such as whether you need to include a dining area for entertaining or a space that can double up as a home office or study. Are you a gadget geek like Dean Signori or a serious foody? Will the kitchen be the focal hub for the family? Designs and solutions exist to meet any of these needs and more.

Whilst a kitchen must meet the needs of your lifestyle today, it is also important to project what your lifestyle will look like in the future and make sure your kitchen fits this brief too. Will you have teenagers in the home who will benefit from open plan living? Will you require solutions that are adaptable to different levels of mobility.

#2 THINK ABOUT YOUR IDEAL LAYOUT – CREATING AN EFFICIENT WORKSPACE

Once you have defined the function of your kitchen, the next step to think about is layout. The path between your oven or hob, fridge and sink is the one you will tread most frequently. This is known as the working triangle and it should be given careful thought to achieve optimum kitchen efficiency. There is no limit to the functionality of today’s kitchens, the challenge is to make the space work perfectly for you.

#3 MAXIMISE EVERY INCH OF SPACE– CLEVER STORAGE SOLUTIONS


Step 3 is to maximise every inch of available space. Think about the different dimensions of your kitchen – not just width and length, but height and depth too. The key is to make the most of what’s available. Clever functionality such as vertical storage units, tables that fold into drawers or pull-out shelves that provide access to tricky corner space can transform kitchen storage.

The choice of styles and solutions can be overwhelming so consider partnering with experts in the field like Häfele. They don’t sell directly to the consumer, they choose to partner with the finest kitchen studios across the country in order to make homes smart, well organised, flexible and future proof. Their Ideas For Living website not only inspires homeowners with ideas and solutions to create their ideal kitchen, but also provides a direct link to their UK-wide network of Studio Partners, who have the knowledge and expertise to transform wishes into a beautiful and functional reality.

Discussing your kitchen ideas with a hand-picked experts can really help you to define your needs, and to create a space that incorporates your chosen style into a design that works for your lifestyle, now and in the future.


This post was first seen at lovechicliving

4th April 2018 D.I.Y

The DIY Mistakes Interior Designers Wish You You’d Stop Making

Deep down, we all fancy ourselves as a bit of an interior design/DIY guru. After all, pretty cushions are pretty cushions, and when it comes to painting a wall, how hard can it be? Right?

RIGHT?

But if you take the time to watch pretty much any renovation reality show, you’ll quickly realise even the most capable (or not-so-capable) DIY decorators aren’t immune to making some pretty epic stuff-ups.

So we spoke to three Aussie interior designers at the top of their game to find out the most common DIY mistakes they see on a day-to-day basis… in other words, what NOT to try at home.

Darren Palmer
Interior Designer, judge on ‘The Block’ and author of HomeSPACE.


“I truly believe the biggest mistake DIY’ers make is not setting a brief. By working out exactly what they need to achieve, what their family requires and what they need to add or subtract from the home to make it work properly as well as considering things like style, mood and budget, people are able to create a plan and plot a path.

“Without the briefing process and having a document to adhere to along the way you can end up with a completely different, or at worst a completely disparate, result than you intended.”Don’t just dive in head first without a plan.
Don’t spend more than you have or more than you should
Don’t worry about what your friends think if you love it
Don’t please only yourself if you plan to sell your property within the next 2 years.
Don’t fall in love with one solution. there are always myriad options and plan b is often better than your first intention.
Don’t be timid. Use your character and personality to inform decisions and commit to them wholeheartedly. It’s not the risks you take that you regret, it’s the chances you missed that keep you awake at night so just have faith, plan and commit to a bold solution that you are passionate about.

Vivian Panagos
Interior Designer and Blogger

“The most common DIY decorating mistake that I see is not taking the time to space plan and draft a furniture floor plan before buying ‘big ticket items’ like a sofa. Furniture needs space to “breathe” and often I see a too-big-for-the-room sofa pushed up against a wall because that’s the only way it will fit in the space or coffee tables that are difficult to navigate around.

“Pushing furniture away from walls and allowing the right amount of space to move freely makes a big difference to how a room feels.

“What you don’t have in a room is just as important as what you do have and a floor plan can help you work through any space planning issues by experimenting on paper before committing to the real deal.”

Jen Bishop
Publisher of Interiors Addict and Reno Addict.

“I think something many people get wrong is being in rush! When you move house or decide to make over a room, it is so tempting to want it all done in a week. We have all become too used to have things immediately!

“The worst thing you can do is go out shopping one Saturday (or worse, online) with the mission to get everything you need for your new kid’s bedroom or living room. It will end in disaster! Even worse if you try and get everything from the same shop.

“Great, authentic, unique interiors which you’ll love coming home to, take time. The best decisions are the ones you sit on for a couple of weeks or even months and keep going back to. This also gives you the time to save up for the couch you really want rather than making do with the cheaper one just because it’s on sale. So my top decorating tip is always to take your time and buy things you really love.

Never paint a room without first trying out some decent sized sample pot patches on the wall, or a few walls, and looking at the effects at different times of day.
“Another mistake we all make is buying things because they’re on trend. Yes, copper, Mongolian sheepskins, fiddle leaf figs, knot cushions and Scandi coffee tables may be all the rage now, but what happens when the magazines have different things next year? By all means buy on trend items but make sure your investment pieces are classics.

“Something you must never do is paint a room without first trying out some decent sized sample pot patches on the wall, or a few walls, and looking at the effects at different times of day, in daylight and artificial light.

“Another mistake to avoid is buying furniture without measuring your space first. The best plan is to mark out your new lounge or rug with masking tape on the floor so you can see how big or small it will feel in the space and if you can walk around pieces comfortably.”


If you’re interested in continuing reading this post, please go to the original article which can be found here at HuffingtonPost!

20th November 2017 D.I.Y

Creative ways to hide ugly parts of the home

Here is something about living spaces though unfortunate, that is a proven fact-99 % of all of them probably have something that is either oddly placed, weird, or merely plain ugly! Whether it is that luxurious apartment across the street, or the secluded bungalow adjacent to the park, every living space possesses some common persistent minor concerns (pipes cords, vents, accessories) that do not necessarily add to the beauty aspect. And while these little ugly problems’ might be annoying and somewhat embarrassing, most are a must stay, especially for you the one paying the rent or mortgage. The best and only solution, however, is getting creative.

If you are in search of some creative ways to help you conceal your home’s eyesores, here are several tricks to get you going.

Fake Rocks

Are your outdoor pipes ruining your otherwise well-manicured lawn? Do away with these necessary eyesores with the help of fake rocks! Easily purchasable online such as on Amazon, these accessories will ideally blend well into your lawn or garden effortlessly.

Fake rock to hide water outlet


Air Vent Cover

Although they may appear messy or even ugly, some fixtures and accessories simply cannot be eradicated from home, and one such fixture is an air vent. In most cases, these immovable accessories are not any pleasing to look at. Nonetheless, one easy way to conceal this eye sore is nailing a standard decorative rug on the house wall like these from ZARA, just above the vent. Although this will not ensure it is out of sight, it will nonetheless dress it up pretty well. Be sure to leave it fairly loose or use one that can let air pass so that you dont fully cover the vents air flow.

A doormat being used to cover ugly air vent


AC Unit Curtain

If it is yet to come, it is of course just around the corner. With summer comes several annoying and embarrassing concerns around the house, and few can match the unsightly and obnoxious AC Units. Other than the difficulty they pose during installations, they look horrendous in your house windows. A simple fix, however, is to cover it with an appealing yet functional half-window curtain to create a refined cover-up.

Net curtain covering air conditioning unit


Decorated Dryer and Washer

As we would all agree, trying to make an item as large as a dryer or washer disappear entirely from sight is difficult. What then do you do? Bring them to the front instead! As crazy as it sounds, you can use simple decorations such as classic colored tape to add polka dots or fun stripes patterns to jazz these accessories up.

Poker dot & striped decals on washer/dryer


Hidden PEX Manifold

While a PEX Manifold is an integral fixture for the overall functionality of a homes heated floor plumbing, this is not to say that they are appealing or something that you want visible. For a quick fix, you may need to incorporate a bit if your DIY flair. You can hide this necessary evil directly behind a characteristic shabby chic radiator style cover or encased wooden unit, and only you have to know about it. However, in a statement from  someone more experienced in these systems…

Brett from https://consumerhomedecor.com says that although these parts may be very ugly and are often hidden during the house build, they should be somewhat accessible in case of a leak or need for extension. The last thing you want if you are unlucky enough to have a leak of some kind is to have to break down other parts of the home/walls to get to the pex manifold so try and make a removable cover or access point.

PEX manifold shabby chic cover cabinet

Radiator cover adapted to cover pex manifold plumbing


Copper Boiler Vent Cover

While your hose cannot function without them, boilers need vent covers and may at times seem very ugly particularly when they are spoiling the beautiful garden appearance being in line of sight looking out down the garden from the side of the house. However, by placing a simple copper boiler vent cover round these eyesores, like this one from Luxury Metals you can ensure they blend in very well in fact become quite an attractive piece.

Copper boiler vent cover for outdoors

Boiler Pipes

On top of boiler vents, we also have boilers pipes. If you’re unfortunate enough to have this eyesore in your home you will be already to familar with how they give you an unfinished look in a space that would otherwise look beautiful. Thankfully for you, we’ve already have a great article on how to cover unsightly boiler pipes that will really serve as a godsend if you’ve had exposed pipes like this in the home for a while and you haven’t quite yet decided whats the best way of ‘removing’ them from your interior.

1st September 2017 D.I.Y

DIY shed building – should you do it?

A shed is simple roofed structure or building usually made of wood where gardening equipment or tools can be kept. This building is usually made within the homes back garden for particular purposes depending on the intentions of the owner. The sheds differ in the simplicity of their structure and to the size, from the small sized roofs to the large structures with either windowless walls or toughened plastic or glass. Some people have also been known to turn them into bars which is a trendy idea that people keen on home brewing tend to do as a hobby and are a great way to relax after a hard days work, often referred to as a man cave.

The sheds are made from different materials, including metals or wood, while others made from pure rocks which is a lot less common than wood or metal due to the precision needed and the extra cost although it definitely looks amazing done with rocks. While those made for farming materials or for industrial storage are in most cases large and are built over wooden frames, those for home and garden storage tend to be wooden flat-pack or custom built from wood as it is much cheaper and easier to do and can last a very long time when properly protected from the elements with a protective covering like creosote and felt.

Shed Design Using Rocks


Pros and Cons of building own outdoor sheds

Advantages

The top most advantage of building a shed is that the individual will have complete control over its structural and aesthetic design. Doing this means that you can build in added features that fit your exacts needs based on the items you intend to store there or for the plan you have in mind overall, whereas with a bought shed your constricted by its preset dimensions and features.

In addition to this you may take your time when building the structure according to your own schedule rather than that of a professional who may be booked up for weeks which is quite common for local tradesmen. Be cautious of the weather though in this approach as you may attract spores and damp if left exposed during a rough, wet and windy period. It is a good choice to use pressure treated wood. Pressure treating is a preservative process that helps wood withstand the elements and wards off termites, microorganisms and fungal decay.

These are chemicals likely to be used in pressure treated wood:

  • Alkaline Copper Quaternary (ACQ)  (click here to learn about ACQ)
  • Copper Azole (CA)  (click here to learn about CA)
  • Micronized Copper Azole (MCA)  (click here to learn about MCA)


Cladded Shed Design With Plastic Windows

Disadvantages

Christopher Loft from Cad Joinery says that “the major disadvantage of having your typical home owner build their own shed is the lack of professionalism and training they have”. A professional will always have their work done according to the specifications required in the field of joinery. However, if an individual who lacks the professional training tries to build a shed from scratch, even a flat-pack, the result may not be as appealing or structurally sound as that of someone in the joinery profession, because of a lack of understanding in the construction process and lack of proper standards. A professional joiner will almost always be listed on bwf.org.uk and so must abide by a professional process to ensure they can be trusted to do a good job, especially since their reputation is at stake.

A number of things can, therefore, be noted from this, for example, the general resulting quality of the shed may be poor. This may result from the usage of low-quality materials which would not have been used if it was a professional carrying out the build. This could in turn incur more cost for repairs as more money might be needed to correct issues or replace wrongly used materials.

Moreover, the choice of location of the site also comes into play. A professional builder will be able to detect locations suitable for building such structures depending on its nature, whether wooden or metallic sheds and spot any potential risks hazardous to the structure in the long term such as subsidence, rot or incorrect placement which may hinder future maintenance like being too close to a wall or fence.

Where minimal skills are held by the homeowner, it becomes difficult for the individual to detect such minute precautions which may lead to bigger and more dangerous problems, if not prevented. For example, a wooden shed cannot be built in a higher place prone to heavy winds. The winds may bring down the structure affecting the cost to the owner.

A Selection Of DIY Tools

Tools & Materials

If you are going to do this yourself you have the added cost of materials and tools, a builder will already own their tools and can cost the build efficiently. A home owner if doing something like this for the first time might not have all these tools or materials and the cost of doing a one off build would be highly inflated and maybe not worth the hassle unless you plan on doing more D.I.Y projects in the future and being able to reuse your tools.

Here are a few reviews and tips of various tools you may need to buy:

  • Cordless Drills
  • Handsaws
  • Pressure Treated Wood
  • Wood Stain
  • Tool Belts


Decision

Whereas the individual always has an upper hand of creativity in the choice of design in building their own shed, it is required that the individual in question should plan more thoroughly  in doings so. The individual need to have a plan for materials, layout, maintenance, organization and must be aware and be ready for challenges which may arise during the whole process.

29th June 2017 DIY Interior

Flower Chandeliers & Hanging Flower Arrangements

A fabulous trend going from coast-to-coast is hanging flowers.  From the ceremony to the reception, these hanging blooms, are making a statement.

  1. One of the trends is called the upside-down garden.  It’s where you take hundreds of flowers, and hang them from the ceiling, making a sea of  of flowers, transforming your ceremony or dance floor into a lush garden above them.  Almost like your floating above the ground.
  2. Another flora trend is flower chandeliers.   Imagine gorgeous blooms, overflowing and draping down off of a chandeliers, or circle hoops over your heads, or dance floor.  They are sure to set the mood, to your nuptials and will have your guests staring in awe!
  3. Inverted Centerpieces.  Does your venue have tall ceilings? A great idea is to have inverted centerpieces, which where you suspend your table center pieces above your guest, drawing their eyes upward.  These look great with long tables, and can really take your wedding to the next level!
  4. Curtain of flowers.  Have a curtain of flowers draped as your backdrop for your ceremony looks stunning.  You can even have it as your back drop of your sweetheart table.  Flowers draping from top to bottom, add a bit of modern flair.  A great idea is to have them monochromatic, and start lighter at the top, and grow dark, as it goes to the bottom.  Another idea is to hang them in picture frames.  They will look like framed works of art.
  5. Hanging glass globes look very modern, and look absolutely amazing.  You can have them as your backdrop of your ceremony, or suspend them across guest tables.  In each globe your can put a single flower for bright glam look, or add more lush greens and succulent for a more of a garden look.


The article Hanging Flower Arrangements was first posted by  http://leighflorist.net

29th June 2017 Furniture Upcycle

RCA graduates propose new Strata system as a way to extend the lifecycle of furniture

Royal College of Art graduates Katrine Hesseldahl and Victor Strimfors have designed a modular sofa made from three distinct layers in an attempt to combat furniture waste.

The sofa is part of a broader manufacturing model called Strata, which the pair imagined for their masters programme in Design Products. The system divides furniture up into a skin, middle and base layer.

By allowing owners to swap out just the layers that are most likely to need changing – the cushion and covering – the duo hopes to offer a more sustainable alternative to throwaway home-ware.

“It’s about less material going into and out of the system,” Hesseldahl told Dezeen. “We really want to have less bulky waste.”

Hesseldahl and Strimfors were prompted to design Strata after reading a report that highlighted the challenges of recycling larger pieces of furniture, such as sofas and beds.

“A lot of people throw sofas out into the street because they’re difficult to recycle, and they become landfill,” Strimfors added. “It’s not worth recycling because it consists of so many different parts and materials, and the work it takes to disassemble it isn’t worth the materials that come out.”

Strata furniture by Katrine Hesseldahl & Victor Strimfors


Strata furniture by Katrine Hesseldahl & Victor Strimfors


Strata furniture by Katrine Hesseldahl & Victor Strimfors

Each layer in the Strata system is generally made of a single material, facilitating easier recycling. The pair designed the Strata base layer in particular to be durable and long-lasting.

It is also adaptable, as the framework for the sofa could potentially be reused for other furniture, or extended.

Strata furniture by Katrine Hesseldahl & Victor Strimfors

By offering the middle and skin layers separately, meanwhile, Hesseldahl and Strimfors intend to give users the ability to personalize and adapt their sofas with the trends – rather than disposing of the entire item.

Hesseldahl said this feature made the system perfect for young people and renters. A prototype of the Strata sofa shows how textiles could be threaded onto the skin layer, for users to create their own patterns.

“They have more freedom to customize and feel at home, even though they may only live somewhere for a short time,” she added.

The duo imagines that landlords might want to rent out apartments furnished with base layers ready for renters to personalize, and that business-to-business ventures might arise to cater to these property owners.

Strata furniture by Katrine Hesseldahl & Victor Strimfors

Strata – which was awarded the Robin and Lucienne Day Foundation prize 2017 – is still in its early stages, and the pair are weighing up whether to partner with a bigger brand, or strike out on their own as a start-up. They also suggest that the system offers potential for the company to collaborate with other independent designers.

“We would like to encourage ourselves as a dot in an ecosystem, and everyone else can tap into our model,” said the duo, who were previously Makers in Residence as part of a British Council project in Shenzhen, China.

Strata furniture by Katrine Hesseldahl & Victor Strimfors

“If we had a digital blueprint or recipe of how you can make the skin layer, you could have a really collaborative model.”

IKEA is concurrently exploring a similar way of making furniture that can be adapted across the course of its lifetime. They demonstrated this approach in their “>recent collaboration with Tom Dixon, the Delaktig bed that can be modified using third party add-ons.


This article ” RCA graduates propose new Strata system as a way to extend the lifecycle of furniture ” was first seen on https://www.dezeen.com

29th June 2017 News

Big Shots raises £23k for furniture charity

The Furniture Makers’ Company, the furnishing Industry charity, has announced that its latest fundraiser Big Shots has raised around £23,000.

The annual clay pigeon shoot fundraiser, which is now in its 23rd year, was once again held at E.J. Churchill Shooting Ground in High Wycombe, Buckinghamshire on 8 June 2017.

A total of 33 teams, made up of representatives from across the furnishing industry, took part in this year’s fundraiser, which was sponsored by Furniture Village as well as the other companies that supported Big Shots through sponsorship or a donation to the auction and raffle.

They were: Amazing Venues, BrightHouse, Cabinet Maker, Cheffins, The Clare Family Trust, Colourfast, Creo, Celtheath, Davy’s of London, Fare of London, J H Haskin & Son Ltd, Knoll, Peroda and ViSpring.

Dr Tony Smart MBE, Master of The Furniture Makers’ Company, said: “Big Shots continues to be a highlight in the calendar and we are incredibly grateful for the support of major sponsor and organizer Furniture Village and all of the other companies for their generosity.

“It is through fundraisers like Big Shots that The Furniture Makers’ Company can achieve its aims of educating young talent for the future, driving excellence and helping people who have fallen on tough times.”

Charlie Harrison, director of multi-channel at Furniture Village and organizer of the event, said: “Big Shots 2017 was a fantastic day which saw industry leaders come together for a wonderful day of shooting and networking.

“I would like to say a huge thank you to everyone who attended and helped make Big Shots a success once again. Big Shots continues to be one of the furnishing industry’s favorite networking days, while also raising vital funds for our industry’s charity.”

Full results of the competition were:

Top Gun (Male): Paul Wiseman of Headlam Flooring Group

Top Gun (Female): Emily Nickless of Sofa Brands International

Top Gun (Novice): Ross Riley of TMWi

Top Team: Headlam Flooring Group

Runner Up Team: Haskins Hot Shots (Haskins Retail Centre)

Bottom Team: Handy Hotshots

Four Man Flurry: Haskins Hot Shots (Haskins Retail Centre)

Worst Male Shot of the Day: Paul Roe of Knoll

Next year’s Big Shots will take place on 6 June 2018.


The article Big Shots raises £23k for furniture charity was first posted on https://www.cabinet-maker.co.uk


« Previous Page
Next Page »

Primary Sidebar

Keep up to date with our latest posts

Subscribe to our newsletter for free and be the first to be notified about all our latest content!

Welcome to A2B Crafts

At A2B Crafts we make it our duty to bring you the latest in shabby chic design and Do it yourself furniture. If you’re new to the craft or a long time expert, A2B crafts is perfect for you. With every new post we hope to bring you something new and exciting which gives you the inspiration to try something new with your home
furnishings. If you feel inspired after reading any of our posts or you’ve even tried these tips for yourself, please feel free to let us know through our contact page or our other social channels!

Footer

Stay Connected

  • Facebook
  • Instagram
  • Pinterest
  • Tumblr
  • Twitter
  • YouTube

Contact Information

Tel: Thursday – Saturday 01328 856001

or mobile 07917606039 at other times

Address: Wheelspeed Unit 1, Cattle Market Street, Fakenham, Norfolk, NR21 9AW

Please feel free to contact at anytime, however at present we work part-time so may not get back to you immediately,
but will make contact as soon as possible.

Categories

  • DIY Interior
  • Furniture Upcycle
  • Hobbie Crafts
  • Interior Decor
  • News
  • D.I.Y
  • Garden

Helpful Links

  • Contact Details
  • Conditions of Use
  • Privacy Notice
  • Shipping & Returns

Copyright© 2025 · Cookd Pro Theme by Shay Bocks